
This assembly demonstrates the operation of the simple electric circuit. Only three easy-to-obtain components are used. Ideal for STEM.
What to explain:
For an electric current to flow, there must be a closed circuit, that is, a round trip to that current.
Thus, when the switch is open, the circuit is interrupted and the current does not flow.
Under these conditions, the X lamp remains off.
When we turn the switch on, the current can circulate and the light comes on.
Note that the switch can be at the top or bottom of the circuit, because in both cases it interrupts the current.
Make a poster showing the operation of the circuit and explain how much you put the switch before and after the lamp, that it controls the current in the same way.
In figure 1 we have the circuit and the assembly.
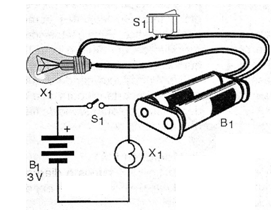
The lamp should be 3 V type (for 2-cell flashlight), a 6 V lamp can be used provided a 4-cell holder is used.
Solder the wires directly to the base of the bulb after wiping the spot so the weld "picks up".
The switch is common and the battery holder can even be achieved in an old, unused transistor.
Material list
B1 - 3 V - 2 small batteries
S1 – On-Off switch
X1 - 3 V lamp (for two-cell flashlight),
Several:
Wires, soldering, support of two batteries.


